Setting Good Ground Rules Part 3
Training Park
Many people wrongly expect the horse will know he is supposed to stand still when he is tied up or is in a horse box, when in reality we should first train every horse that once you ask him to stop, he should not move nor follow you until you ask him to do so with your lead rope or reins. This is what we call ‘Park’.
Park is a fantastic technique to maintain and improve relaxation and it also helps to consolidate the halt. It is great for horses that tend to fidget around, that are anxious, want to push into you, paw the ground when tied up, or generally don’t know how to stand still. It is also important because standing still is a must for all sorts of daily procedures, grooming, picking up their feet, saddling, bridling, mounting etc, and these tasks are all a lot easier when the horse has been trained to park.
Park is also part of training the horse to stand during travel, to stand quietly in the racing barriers and in the vet crush.
I explained how the progress from a basic attempt to obedience level happens by training the “go” and “step back” responses to the whip tap. Once you have reached obedience level in “stop” and “go” you are ready to train “park”.
Obedience level in “stop” in hand means that your horse is able to stop in 1.5 steps (from walk) or step back two clear steps (from halt) immediately from light backward lead rein pressure, he should also step back from a single light whip tap. Obedience level for “go” in hand means he steps forwards immediately from a light forward lead pressure.
With the ‘park’ response you are aiming to teach the horse that once you have asked him to stop, he’s not to move or follow you, even if you move away, unless you ask him to do so with your lead or reins. We only want the horse to follow us after we give him the aid to move.
Some trainers specifically train their horses to follow them, but there are many times when you need the horse to stand still while you move around, and it is too difficult for the horse to differentiate when he should follow and when not.
Say you wanted to move a couple of steps away to pick up a brush, you don’t want the horse to follow you, for a start he might be tied up. If you move towards his hindquarters say to pick his feet, again you want him to stand still in one spot, you don’t want him to be backing away from you or moving sideways around you. So I specifically train horses to always stand still until I give them the aid or cue to move.
TRAINING PARK
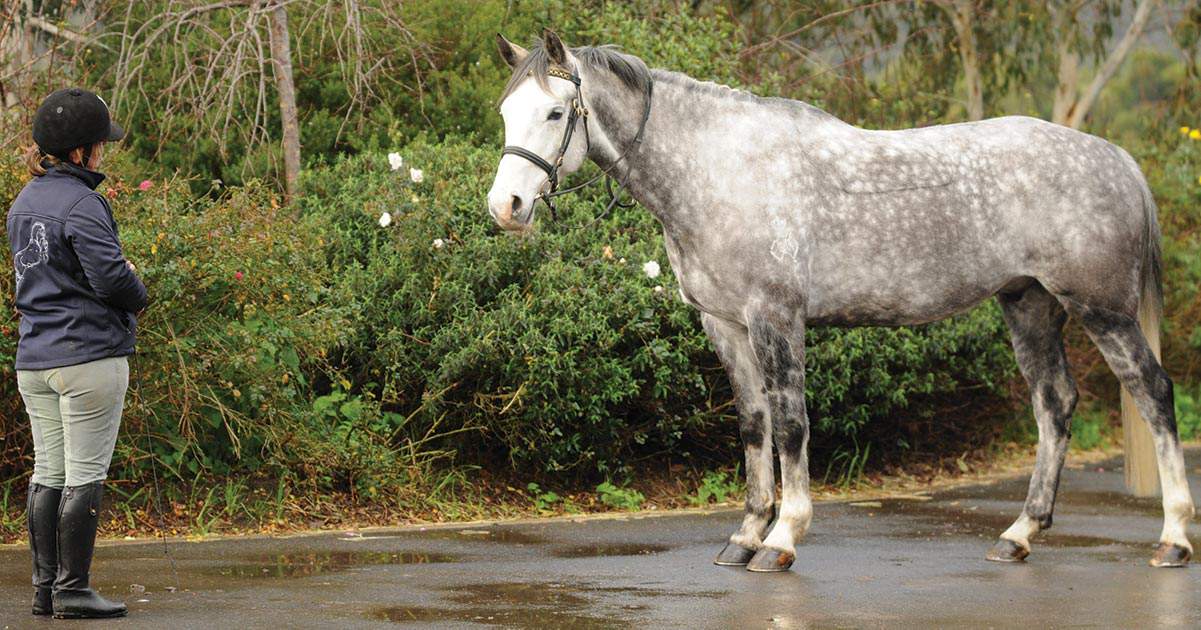
To train park we will still start facing the horse, so we can see clearly what he does with his feet. Start your “park” training in an area where your horse feels reasonably comfortable. Lead him to the spot where you want him to park and give him the stop aid (a light backwards pressure from the lead rein). He should stop in one and a half steps (if he doesn’t, or he feels heavy, you may need to refresh the “stop” lesson until you achieve obedience level again). Once he has stopped, move away from him, say 1m still holding on to your reins but without applying any pressure, and have your dressage whip ready to correct any forward steps he may take.
When you move away he will probably take a step towards you, the moment that he does, tap the canon bone of the leg he has moved until he takes a step back. It is important that he does take a step back and not just stop. He should step back to the position he was in. If he takes a step sideways with a front or hind leg, you also want to tap his canon bone and ask him take a step back. If he takes more than two steps forwards, you may have to use your lead rein pressure to make him stop, and then use the whip again to make him step back to where he was.
STEP-BACK FROM THE WHIP
You may have noticed that I am asking the horse to step back using only the whip, and no rein pressure. This is because the whip allows me to reach the horse without having to move towards him. The whip is like an extension of our arm, and from 1m away we can still use it effectively to achieve a step back. If we were to use rein pressure, we would have to approach the horse first, and instead of learning to stand still, we may instead teach him to step back when we walk towards him.
Once you have corrected him with a step back, move towards him again at least to where his head is, and then back away 1m again, he will probably take a step towards you again, so correct him again with a tap, making sure he does actually step back, and then move towards him again. Repeat this a few times, if you consistently achieve a step back each time he moves a foot, he will soon figure out that he is better off standing still, and you will be able to progressively move away further and further each time, until you reach the end of the lead rein or the buckle of the reins.
Try also going from one side to the other side in front of him. Basically you should be able to move anywhere the length of your reins allows while the horse stands still, but be sure to never put any pressure at all on the reins and be ready to correct him if he moves.
MAKING PROGRESS
When your horse is parking well, turn around and face in the same direction as him and without putting any rein pressure, walk forward from his shoulder, being ready to correct any forward steps with the whip if he should follow you. You should be able to walk past your horse without him moving, and can even take it further to doing some small running steps, again making sure you don’t accidentally put pressure on the reins. The reins have got to remain loopy at all stages.
Another useful exercise is to ask the horse to park, and while he stands still, back away to the end of the reins, then ask him to move forward with light forward rein pressure until he comes up to you. When he does, ask him to stop and re-park, then back away again to the end of the reins.
If the horse wants to look around, that’s fine, he’s allowed to look around as long as he doesn’t move his feet.
Many people have problems training their horses to stand still because they try to control the horse’s head and they do so by putting pressure on the horse’s mouth without making him move his feet, which becomes very confusing to him.
Be careful not to correct the horse’s head from moving, really, once they understand the task, which is that their legs are staying still, they will relax and they will tend to look around less. Looking around is a sign of insecurity that will dissipate when he keeps his legs under your stimulus control.
PROOF: PARK ANYWHERE, ANY TIME
Once you have your horse parking well in one area, you can progress by asking him to park in different places. You can start by turning him around so that he is facing in a different direction where he has a different view, then go and train him in other places and keep progressing until you can park anywhere and anytime.
When your horse has reached obedience level in “stop”, “go” and “park” and is focusing on you a bit more, you can also start to add voice commands like “stand” for park, “walk on” for go and “whoa” for stop. You say “stand” and walk away.
This is classical conditioning, and for the horse to learn the voice command, timing is important, you need to give the voice aid very slightly before and as you give the actual pressure aid. Even for “good boy” there’s no point saying good boy, waiting five seconds and then rubbing his wither, you have to do both at the same time for the horse to learn the association. For step back, say the word “baack!” and tap the canon bone as you say the last half of the word.
In the next article Part 4 we will explain about yielding and how to train it – both the shoulders and the hind quarters as this is a great way to achieve straightness and prepare the horse for turns and lateral work under saddle.
[wpdm_package id=60794 template=”link-template-calltoaction3.php”]


